WYSIWYG Editor
Wysiwyg is the abbreviation for „What you see is what you get.
In practice it means that the content, which you will create in this editor, will be identical on the website - in the slide-out window or as an article in Help centre.
Here's an overview of the basic functions that will help you enhance your article:

Scissors will remove the marked text. So will the keyboard shortcut CTRL+X.
2 sheets of paper will copy the selected text. So will the keyboard shortcut CTRL+C.
Text on the white paper will paste the copied or removed text. So will the keyboard shortcut CTRL+V.
If you have copied a text from elsewhere, which included formatting, you might find useful another function Paste as a clear text. In some cases there can be a problem with pasting of an already formatted text from one editor to another. That is why it's always better to paste the text as clear, unformatted, and edit it right here. The last function should be able to insert a formatted text from Word. Try this function, but if the text won't be inserted correctly, it's necessary to paste the text as clear.
The favourite arrow functions are a step back and a step forth. They come useful for writing of almost any article.

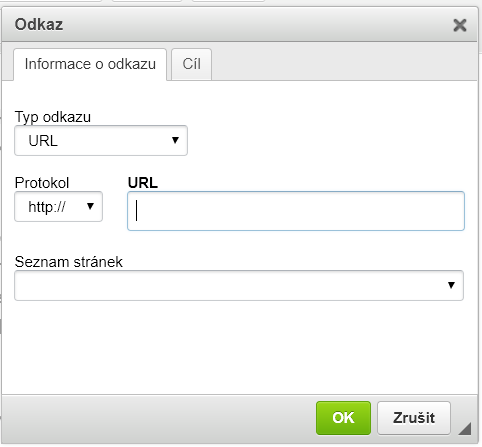
Chain icon means to insert and edit a reference. Select a picture or a text which is supposed to be a reference to another website. Click on the chain icon and a popup window will open.

In the box URL simply write the address, where is the link supposed to lead to. For example www.blubla.ble
The reference will be opening in the same panel. If you want it to be opening in a new panel, go to bookmark Aim and select New window.
If you refer to an article saved in Beyond, you don't have to fill in URL - all you have to do is to select the required web page in the list below.
You can also use the chain icon to insert a reference to e-mail. A mail client will open after clicking on this link and the customer can write you an e-mail. To achieve that you have to switch the Reference type from URL to E-mail.
A reference to the anchor can be also inserted here. It is a reference to a certain part of the article. First you need to determine where should the anchor lead to - by marking the certain place with a Bookmark. Click on the place, then click on the flag icon and give the place a name. Then mark a word or text that is supposed to lead to the anchor. Switch the Reference type to Anchor and select the anchor by its name.
With the middle icon of a chain with a small X you can remove the reference. Mark the text with the reference and click on the icon.
 Insert / edit a picture
A picture is inserted by clicking on the landscape icon. A popup window opens. There you can choose whether you want to use a picture used on the website in another article, or insert a new picture from your PC.
Before you insert the picture you can edit it. For example change its size. Don't forget to click on the lock icon, if you want to change the picture's size without deforming it.
The inserted picture can be edited additionally as well. Just mark it with your mouse and click on the landscape icon again.
 Insert / edit a table
| In the popup window you can choose |
how many rows should the table have, |
| how many columns |
and how thick should the frame be. |
| You can even name the table. | Then you can put text or pictures into it. |

With bolts you can expand your text editor to the whole screen. It comes useful when working on extensive articles. To save the article you have to reduce it back again.
You can even display distribution into blocs.
If you want to edit article's HTML, switch to Source.
 Font style
B - bold font, shortcut CTRL+B
I - italics, shortcut CTRL+IS - crossed out font
T with small x - cancel formatting of the marked text

Aligns paragraph (or the marked text) to the left, middle, right or to a bloc.

Text formatting
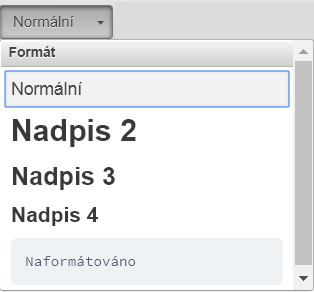
You can choose between normal formatting for casual texts and Titles. They are marked in HTML as <H2> to <H4>. Using titles you can logically hierarchize the text.
Title 1 is a name of an article. There should be just one Title 1, thus it is not in offered as an option in the list. You can use other titles more, just beware of the right order. For example Title 3 should not appear above the first Title 2.
